 The Prep Bible.
Survival Shelter Types: What to Build and What to Carry
Shelter is the thing that keeps you alive when the weather turns, and the type you build depends on the ground under you, the season, and how much daylight you have left. If you have a tarp and cordage, rig a tarp shelter and you are done far quicker than any natural build. If you have nothing but a knife and a forest floor, build a debris hut and plan on a long stretch of hard work.
The shelter types worth knowing are few. A lean-to for a dry night with a fire in front. A debris hut for cold nights with no fire. An A-frame when the wind is swinging around. A tarp ridge line or plough point when you are carrying gear. A snow trench or quinzhee when the ground is buried and the trees are not giving you much.
This guide walks through each one, what it is actually doing for you, how it goes together, what changes once the temperature drops below freezing, and the small bit of kit that turns an hour of building into fifteen minutes. The Prep Bible does not sell tarps or tents, so nothing here is a pitch for one. It is the skill, and the fixed blade survival knife and everyday carry flashlight that support it.
What a Survival Shelter Actually Has to Do
A survival shelter has three jobs, in this order: stop moving air, stop water, and stop heat leaking into the ground. Get those three right and the shape barely matters. Get any one of them wrong and a beautifully built shelter will still give you a miserable, cold night.
Wind is the one people underestimate. Still air trapped in dead leaves, grass, pine duff or a sleeping bag is what insulates you. Moving air strips that away. A shelter that blocks wind on the weather side is doing more work than one that looks fully enclosed but has gaps at the base letting a breeze run through.
Ground conduction is the one that catches beginners out. You lose heat far faster lying on cold ground than you do into cold air, because the ground is in direct contact with you and does not warm up. That is why every shelter type in this guide starts with the same instruction: build the bed first. A thick mat of dry debris, boughs, grass or a closed cell foam pad goes down before you worry about the roof.
Keep the inside small. A shelter you can heat with your own body is one you can nearly fill lying down. A big airy structure looks more impressive and will be colder. Low roof, tight ends, just enough room to lie in and turn over.
Picking a Site Before You Pick a Shelter Type
Walk the ground before you cut anything. The site decides the shelter type far more than your preference does. Ten minutes spent choosing well saves an hour of building in the wrong spot.
Look up first. Dead limbs, leaning trees and hanging deadwood over your sleeping spot are the quiet hazard, and they are the reason not to camp under an obviously damaged tree. Then look down: avoid the bottom of a gully or dry creek bed, where cold air pools and water runs when it rains. A slight rise or a bench on a slope is usually better than a flat hollow.
Then check what is nearby. Deadfall and leaf litter mean a debris hut is viable. A standing pair of trees the right distance apart means a ridge line. A big fallen trunk or a root plate is half a shelter already, and leaning poles against an existing anchor saves a lot of work. Water close but not too close, and check the local land manager's camping setback rules for water, since they vary by area.
Last, note where the wind comes from and where the sun will come up. Put the closed back of the shelter into the wind and the opening away from it. Facing the opening east gets you morning sun, which matters more than it sounds like when you have been cold all night.
Debris Hut, Lean-To and A-Frame: The Core Builds
These three are the natural material shelters worth practising. Everything else is a variation.
The lean-to is the fastest. Lay a ridge pole between two trees or across two forked uprights at about waist or chest height, lean poles against it at an angle on the weather side, then layer on brush, boughs or bark from the bottom up so each layer sheds water onto the one below, like shingles. The open face goes away from the wind, and it pairs with a long fire laid parallel to the opening so the sloped roof reflects heat back onto you. A lean-to on its own, with no fire, is a wind break and a rain roof, not a warm shelter.
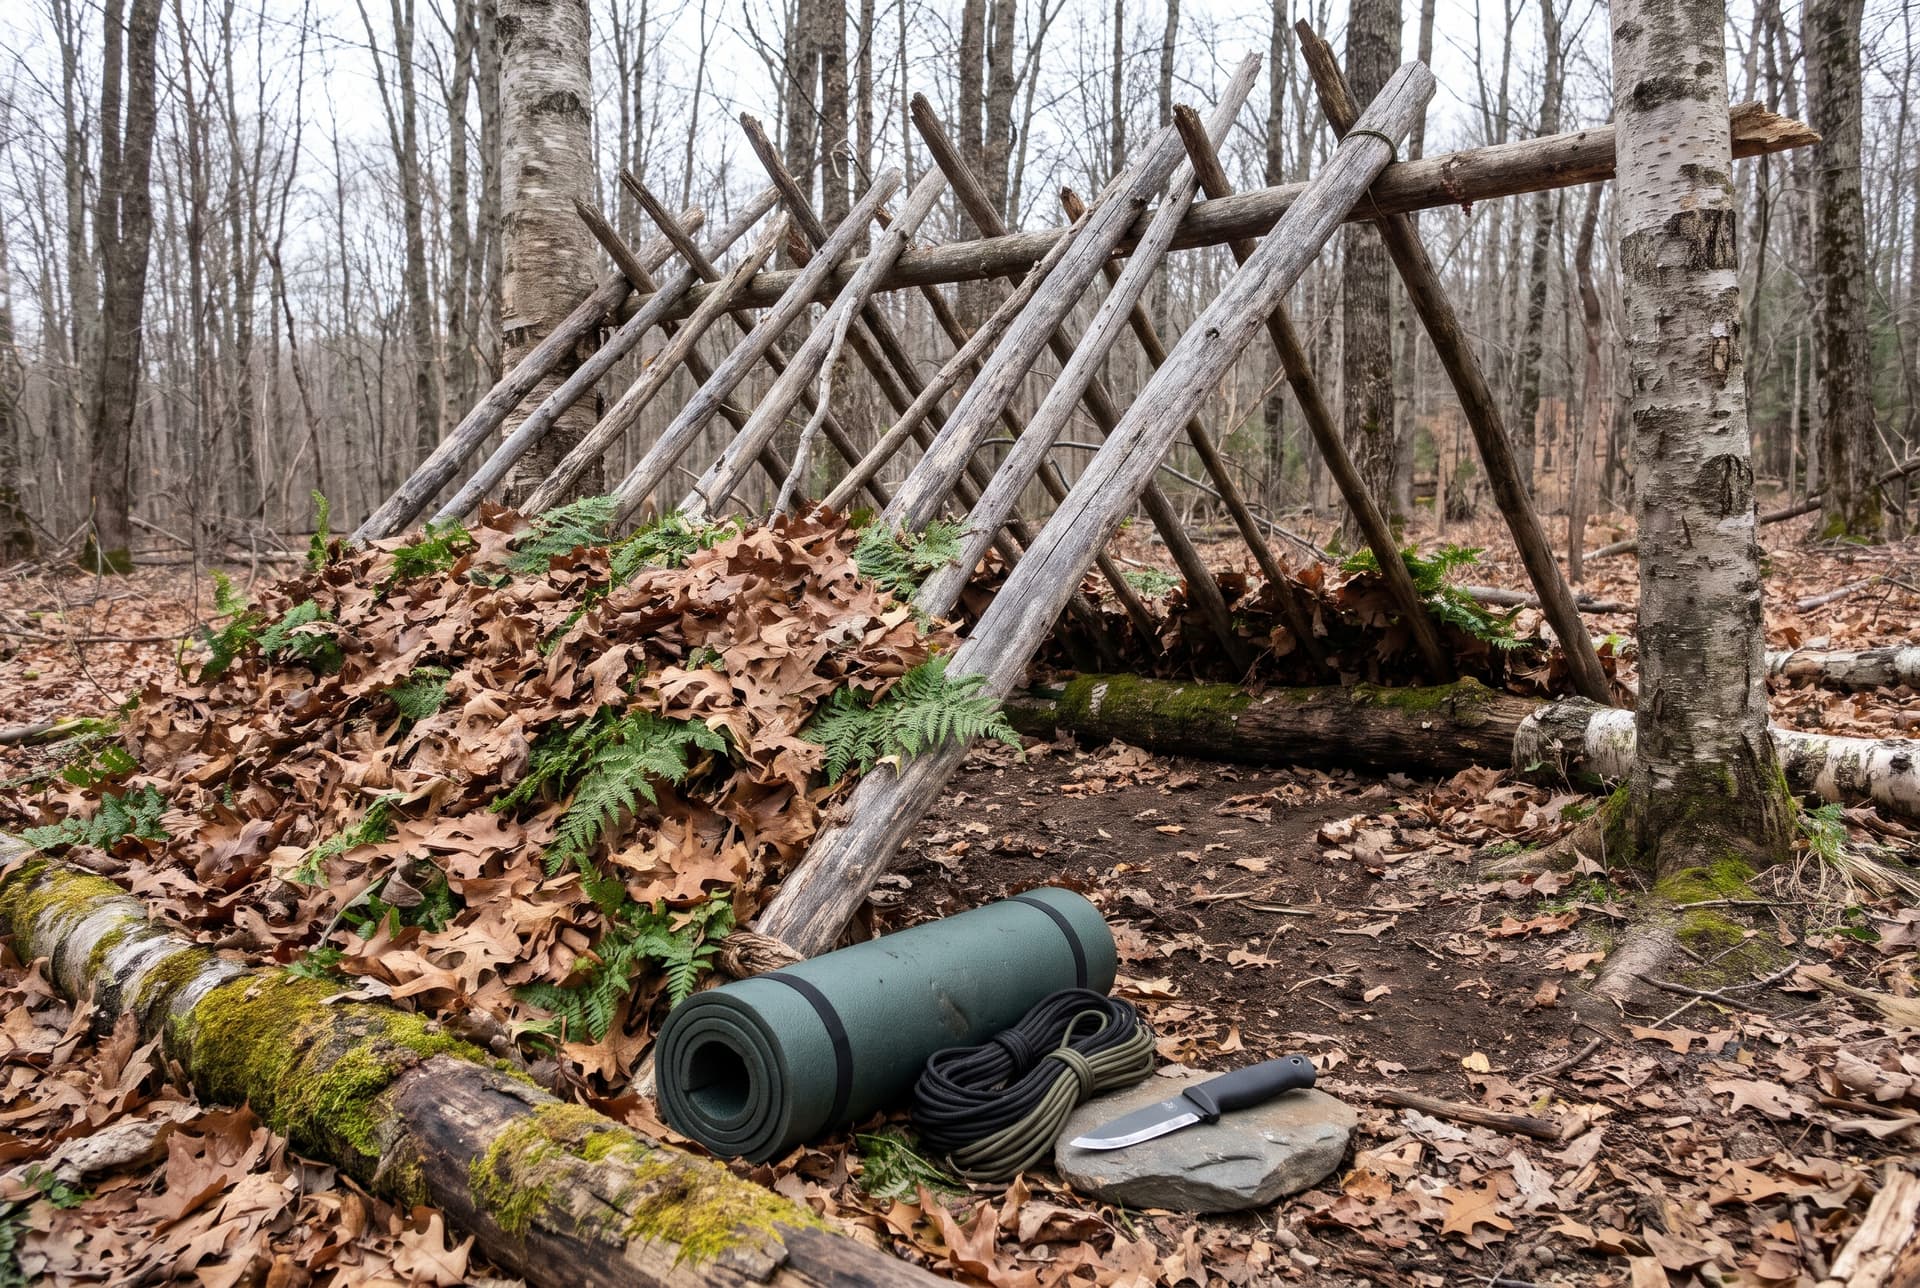
The debris hut is the one that keeps you alive without a fire. One end of a stout ridge pole sits on a stump, rock or tripod at about hip height, the other end on the ground. Ribs lean against the ridge pole along both sides to form a long wedge, close enough together that debris will not fall through. Then you pile on leaf litter, pine duff, grass, ferns, anything dry and lofty, until the walls are thick, often thigh deep or more. Stuff the inside with the same material so you are lying in insulation, not just under it. Plug the entrance with a debris-filled pack or a bundle once you are in.
The A-frame is a debris hut with both ends raised, or a tarp pitched the same way: a ridge line with two sloping sides down to the ground. It sheds wind from either side and handles rain well, but it has two open ends that need blocking or they act as a wind tunnel. It is a good choice when you cannot predict the wind direction or when you want to sit up at one end.
| Shelter | Build time | Needs a fire | Good for |
|---|---|---|---|
| Lean-to | Short | Yes, to be warm | Rain and wind off one side, cooking and drying out |
| Debris hut | Long | No | Cold nights with no fire and plenty of leaf litter |
| A-frame | Medium | No | Shifting wind, rain, sleeping two if built long |
| Tarp ridge line | Minutes | No | Any time you are carrying a tarp and cordage |
| Snow trench | Short to medium | No | Deep snow, open ground, little standing timber |
| Quinzhee | Long, plus set time | No | Deep snow and a night or more in one place |
Build times are relative, not measured. They depend on tools, materials on hand and how much of the structure already exists on site.
Tarp and Cordage Shelters You Can Set Up in Minutes
If you are carrying a tarp, a few metres of cordage and a handful of stakes, you have the fastest shelter in the woods. The skill is in the pitch, not the gear.
Start with a ridge line between two trees, pulled tight and tied off with a knot you can release under load. A taut line hitch on the guy lines lets you tension the pitch without retying. Drape the tarp over the ridge line for an A-frame, or clip one edge along it and stake the other edge out low for a lean-to. The lower you pitch it, the better it handles wind and the warmer it feels. The higher you pitch it, the more room and ventilation you get.
Two pitches worth knowing beyond those. The plough point, where one corner is tied high to a single tree or pole and the opposite edges are staked down, makes a three-sided wedge out of a square tarp and needs only one anchor. The half pyramid, where the tarp is pitched off a single pole or a tree with a closed back, is good in open country with no pair of trees to work with.
Always pitch so the low, closed side faces the weather. Carry a few more guy lines than you think you need, and get in the habit of leaving a short loop of cord at every tie-out point so you are not fiddling with knots in the dark with cold hands. If you have a reflective tarp or an emergency blanket, the reflective side faces in, towards you, with an air gap between it and your body.
Winter Shelters: Trenches, Quinzhees and Getting Off the Ground
In deep snow, the snow is the building material. It traps air, so it insulates, and it is sitting right where you need it. The trade-off is that working in snow makes you sweat, and sweat in winter is dangerous. Work slowly, strip a layer before you start, and put it back on the moment you stop.
A snow trench is the quickest. Dig a slot long enough to lie in and deep enough to get below the wind, pile the spoil along the windward edge, then roof it with poles, branches, slabs of compacted snow or a tarp, and cover that with loose snow. Avoid the hollow that forms around the trunk of a big conifer as a shelter spot. Tree wells are a known snow immersion suffocation hazard, and the branches above will dump snow on you when the wind picks up.
A quinzhee is a mound of snow piled up, left to settle and sinter, then hollowed out from one side. It is warm and sturdy, but it takes real work and it needs time to set up before you dig, so it is a shelter for a planned stay rather than an emergency at dusk. Use a bundle of sticks pushed into the mound to gauge wall thickness as you hollow, and poke a ventilation hole through the roof. Any enclosed snow shelter needs ventilation, and nothing that burns fuel belongs inside one.
Whatever you build, the insulation under you matters more in winter than anything else. Spruce or fir boughs laid thick, butt ends down and shingled, or a closed cell foam pad, or both. Cold snow conducts heat out of you all night. A roof over bare snow with nothing underneath you is a cold night waiting to happen.
Two winter habits worth keeping. Brush snow off your clothing before you get inside, because it will melt and wet you out. And mark the entrance and your gear with something visible, because fresh snow and darkness make a buried shelter very easy to lose.
The Gear That Makes Shelter Building Faster
A shelter you build with nothing is slow work. The same shelter with a few items in your pack goes up far quicker. These are the categories worth carrying.
A fixed blade knife is the backbone. You use it to point stakes, notch a ridge pole, baton small limbs, split kindling for the fire you will want afterwards, and strip bark for cordage. A fixed blade handles the levering and batoning that a folder should not be asked to do. Keep it sharp, because a dull blade makes you push harder and push is how people get cut when they are tired and cold. The Prep Bible carries the Shrade Extreme Survival Slim Fixed Blade, and there is a folding knife sharpening guide linked below if yours has gone dull.
Cordage is the next most useful thing. A few metres of paracord or similar line turns a tarp into a shelter and turns three poles into a tripod, and the store does not stock cordage. Carry more than one length so you can cut some without losing your ridge line. Learn three knots and leave it there: a bowline for a fixed loop, a taut line hitch for adjustable tension, and a timber hitch or a round turn with two half hitches for tying off to a pole.
A headlamp or compact flashlight earns its weight every time, because shelter building almost always runs into dusk. Hands-free light is the difference between finishing a roof and giving up on it. Keep the light where you can find it by feel, not buried in the pack. The store carries the SureFire EDC1-DFT Turbo everyday carry flashlight.
After that, none of which the store stocks: a closed cell foam pad or anything that insulates you from the ground, an emergency blanket or bivvy, a few tent stakes, a contractor-grade bag that can be stuffed with debris as a ground mat, and dry gloves. Gloves are the quiet one. Cold wet hands end a build faster than cold feet do. And cover your fire kit while you are at it, since most shelter types assume a fire is coming next.
The Mistakes That Make a Shelter Cold
Most failed shelters fail the same handful of ways, and all of them are fixable before dark.
Building too big. A shelter sized like a tent is a shelter you cannot warm. Make it just big enough to lie in and move in. If it feels tight, it is probably right.
Skipping the bed. People roof first because the roof is visible progress. Build the bed first, then roof. If you run out of light you want insulation under you, not a half-finished ceiling over bare dirt.
Thin walls on a debris hut. Debris compresses and settles. What looks thick when you pile it on will be half that by morning. Pile on more than you think, then add more again.
Roofing from the top down. Material has to shingle, lowest layer first, each one overlapping the one below, or water tracks straight through. The same applies to bark slabs, boughs and bundled grass.
Cutting live wood when deadfall is all around. It is slower, it is wetter, it is harder on your blade, and in many places it is not permitted. Rules on cutting vegetation, lighting fires and building structures vary by state, by land manager and by local jurisdiction, so check the regulations for the ground you are on before you start, and in practice use deadfall and leave no structure behind.
Practice Runs: Build One Before You Need It
The first time you build a debris hut should not be the night you need a debris hut. The gap between knowing how a shelter works and being able to put one up in failing light with cold hands is wide, and the only way to close it is to do it.
Set up a practice run with a safety net. Go out on a day you have time, build the shelter, sleep in it with your normal camping gear nearby and a vehicle or a tent within reach. You will learn things you cannot read: how long gathering debris really takes, how much of a pile disappears when you pack it, whether your knife handle gets slippery when wet, how cold the ground is through the bed you built.
Time yourself honestly. Note the hour you started and the hour you were lying down. Then run the same build with just your pack contents and see what changes. That number is the one you will plan around when you are deciding whether to push on for another hour or stop and build.
Do one build in each season if you can. Summer debris behaves nothing like wet autumn leaf litter, and neither behaves like snow. And practise where it is allowed: established campsites, private land you have permission on, or courses run by a recognised bushcraft or wilderness skills instructor. A weekend with a good instructor teaches more than a season of reading, and the same goes for a wilderness first aid course from a recognised provider, which belongs alongside shelter on any list of skills worth having.
Cutting tools for shelter work
Fixed blade and survival knives for processing deadfall, stakes and kindling.
Light for the last hour before dark
Hands-free and pocket lighting, because shelter building almost always runs into dusk.
Cordage and water-side safety gear
Rope and flotation from the marine shelf, useful around cold water and wet crossings.
Common questions
- What are the main survival shelter types?
- The core natural builds are the lean-to, the debris hut and the A-frame. Add tarp pitches such as the ridge line A-frame, lean-to and plough point when you are carrying a tarp and cordage, and snow trenches and quinzhees for deep winter. Everything else is a variation on those shapes, adapted to the materials and anchors you have on site.
- Which survival shelter is warmest without a fire?
- The debris hut, built small and packed thick. It works by surrounding you with trapped air in dead leaves and duff, both under you and over you, so it does not depend on a heat source. A lean-to is faster but it needs a fire in front of it to be warm. Snow shelters also work without fire, and no fuel-burning device should be used inside one.
- How long does it take to build a survival shelter?
- A tarp pitch takes minutes once you know the knots. A lean-to from natural materials is the quickest of the natural builds. A debris hut with thick enough walls usually takes well over an hour of steady gathering, and a quinzhee takes longer still because the snow has to settle before you hollow it. Time your own builds in practice so you can plan against real numbers.
- Do I need a knife to build a survival shelter?
- You can build a debris hut with bare hands and deadfall, but a fixed blade knife makes everything faster: pointing stakes, notching a ridge pole, splitting kindling and processing cordage. A fixed blade handles levering and batoning better than a folder. Keep it sharp, because a dull blade means more force and more risk when you are cold and tired.
- What goes under you in a winter shelter?
- As much insulation as you can gather. Spruce or fir boughs laid butt-down and shingled thick, a closed cell foam pad, dry grass, or several of those together. Snow and cold ground pull heat out of you all night through direct contact, so bedding matters more than the roof. Build the bed before you build the walls.
- Is it legal to build a shelter in the woods?
- It depends entirely on where you are. Rules on cutting vegetation, collecting deadwood, lighting fires and leaving structures vary by state, by land manager and by local jurisdiction, and they change seasonally with fire restrictions. Check the regulations for the specific land you are on before you build. For practice, use private land with permission, established campsites, or a course run by a recognised instructor.
Sources
- Conduction as a mechanism of heat loss, described in standard wilderness medicine and hypothermia prevention references (Wilderness Medical Society practice guidelines on hypothermia prevention).
- Convective heat loss and the insulating value of trapped still air, standard physics of insulation as applied in cold weather survival training.
- Carbon monoxide hazard from fuel-burning appliances in enclosed spaces, US Consumer Product Safety Commission guidance on carbon monoxide.
- Sintering of disturbed snow, described in standard snow science and avalanche education references.
- Land use regulation differs by managing agency and jurisdiction; see US Forest Service and Bureau of Land Management local area rules and seasonal fire restrictions.